Helpful application examples for mechanical engineers.
The Concept of inCAD Library
Online application library with a range of ideas for all manufacturing industries.
Save design time and learn new design applications when you are concepting new machines.
Disclaimer
MISUMI may not offer all parts in each application design. Available parts can only be purchased separately not as a unit shown in each application design.
MISUMI does not guarantee quality, accuracy, functionality, safety or reliability for the combination of the parts in each application example. Accept these points prior to use.
2014 Copyright MISUMI
The data cannot be used for any purposes (including sales promotion) except for designing your machine.
All associated CAD is free. MISUMI reserves the right at its sole discretion to cancel, terminate or modify this offer.
MISUMI may change, add or delete application examples posted without prior notice.
MISUMI assumes no responsibilities for any damage incurred resulting from your use of the Service or any change, addition or deletion by MISUMI of the application examples for any reason whatsoever.
Features of inCAD Library
Get great new design ideas for these application examples.
Over 200 design application ideas collected from dozens of industries!
Find application examples quickly! Search by function, workpiece shape, etc.
Download the CAD models for each application example.
Log in to download free CAD models.
Download CAD for the entire application example!
Good IDEA! Button
Click the Good IDEA! Button when you like an application example!
*Can only be clicked once per application example.
Upper right corner on the page of application example details
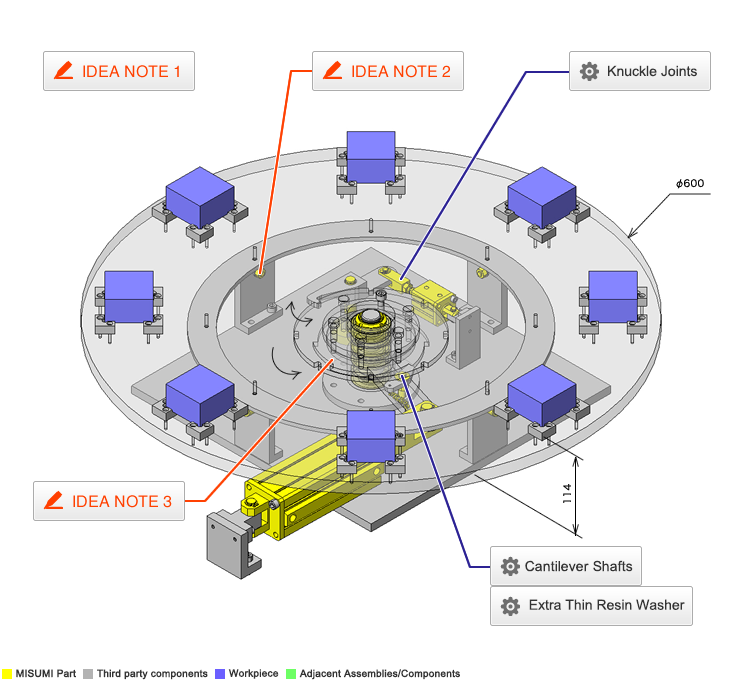
IDEA NOTE Structure with an air cylinder does not require motor.
It is possible to construct a turn table even without knowledge of motors.
IDEA NOTE Enhanced rigidity
A structure is employed in which the cam follower can also receive the load of the turn table.
IDEA NOTE Axis cross-sectional view
The ratchet plate and the positioning plate are fastened with screws.
TERMS AND CONDITIONS FOR USE OF CAD DATA
Your access to the CAD data that MISUMI Corporation (hereinafter referred to as the Company) posts on this site (including 3D CAD data, intermediate 3D CAD data and 2D CAD data; hereinafter referred to as the Data) are of products manufactured and/or sold by the Company (hereinafter referred to as the Products) assumes that you have read and accepted these terms and conditions which govern your use of the Data. If you do not agree to these terms and conditions, you must stop using this website and the Data. You must not use the Data for any unlawful purpose or in any manner inconsistent with these terms and conditions.
1. CAD Data
The Data is prepared for assisting the Company's users in the CAD design process by providing dimensions and other Product information. In order to provide the best speed and stability working within this site, the Product drawings were simplified to reduce the size of the Data. For instance, some of the Products are shown without the oil groove shape, screws or spring shape. Also, please be aware that the tolerance, surface roughness and/or chamfer of the Data may vary from the actual Products.
2. Disclaimer on Data
While the Company has carefully prepared the Data, accuracy of the Data is not guaranteed and is subject to the variances as described above. The Company may also modify, add or delete the Data at any time without prior notice. The Company assumes no liability for any direct, indirect, consequential or special damages that you may claim resulted from your use of the Data or any changes to or deletions of the Data regardless of the reason. The Company provides no warranty as to the quality, accuracy, functionality, safety or reliability of the combination of Products and parts. Example applications and combinations of the Products are provided for illustrative purposes only.
3. Copyright
Copyrights to the content and the Data belong to the Company or the manufacturers of the Products. The said copyright is protected by the Copyright Act and international treaties. The use (including duplication, modification, uploading, posting, transmission, distribution, licensing, sales and publishing) of the Data except for the purpose to use the Data described above without prior approval of the Company is not allowed. The Data cannot be used for any purposes (including sales promotion) except for designing your machine. If you violate this provision or the laws or regulations, the Company may prohibit you from the use of the Data, the Company’s site and/or take legal action. So long as you comply with these terms and conditions, the Company grants to you a non-exclusive, non-transferable, revocable license to access and use the Data for the sole purpose of assisting you in designing machines that incorporate products.
4. Disclaimer of Warranty
ANY AND ALL CONTENT APPEARING ON THIS WEB SITE IS PROVIDED FOR INFORMATIONAL PURPOSES ONLY. THIS WEB SITE, ITS CONTENT AND ITS LINKS ARE PROVIDED ON AN "AS IS" AND "AS AVAILABLE" BASIS AND ARE USED ONLY AT YOUR SOLE RISK, TO THE FULLEST EXTENT PERMISSIBLE BY LAW. THE COMPANY DISCLAIMS ALL WARRANTIES, EXPRESS OR IMPLIED, OF ANY KIND, REGARDING THIS WEB SITE (INCLUDING ITS CONTENT, HARDWARE, SOFTWARE AND LINKS), INCLUDING AS TO FITNESS FOR A PARTICULAR PURPOSE, MERCHANTABILITY, TITLE, NON INFRINGEMENT, RESULTS, ACCURACY, COMPLETENESS, ACCESSIBILITY, COMPATIBILITY, SECURITY AND FREEDOM FROM COMPUTER VIRUS. THE COMPANY WILL NOT BE LIABLE FOR ANY DAMAGES OR LOSSES, INCLUDING DIRECT, INDIRECT, CONSEQUENTIAL, SPECIAL, INCIDENTAL OR PUNITIVE DAMAGES AND/OR LOST PROFITS, IN CONNECTION WITH USE OF THE INTERNET, THIS WEB SITE, ITS CONTENT OR ITS LINKS Further, the Company will not be liable to you for any failure or delay by the Company to provide access to the Data or any of its obligations under these terms and conditions where such failure or delay is the direct or indirect result of any circumstances beyond the Company's reasonable control (and the Company's obligations will be suspended for the duration of such circumstances).
5. Policy of Third Parties
You may be required to separately agree to third party's policies if you use third party software to create or browse the Data or use a third party’s CAD data. In this case, the Company does not assume any responsibility for defects of such CAD data or the software of the third party or violation of their rights. Understand them before use.
Assembly data shows the assembly drawings in the concept design phase. The sole purpose of the data is to explain the structure and functionality of the assembly and is not considered nor to be used as a final design.
You will need to edit the Data so that it meets your specific design conditions.
The CAD data unit assembly consists of sub-assemblies.
Each sub-assembly unit can be used as it is or can be edited.
* The part in the frame is a sub-assembly unit.
The Data for fabricated parts is based on easy-to-edit dimensions and shapes in sketches and histories.
The Data including the third-part components are made by the Company.
* Unit assembly CAD data consists of some sub-assemblies.
Each sub-assembly unit can be used as it is or can be edited.
Application Overview
Purpose
Purpose
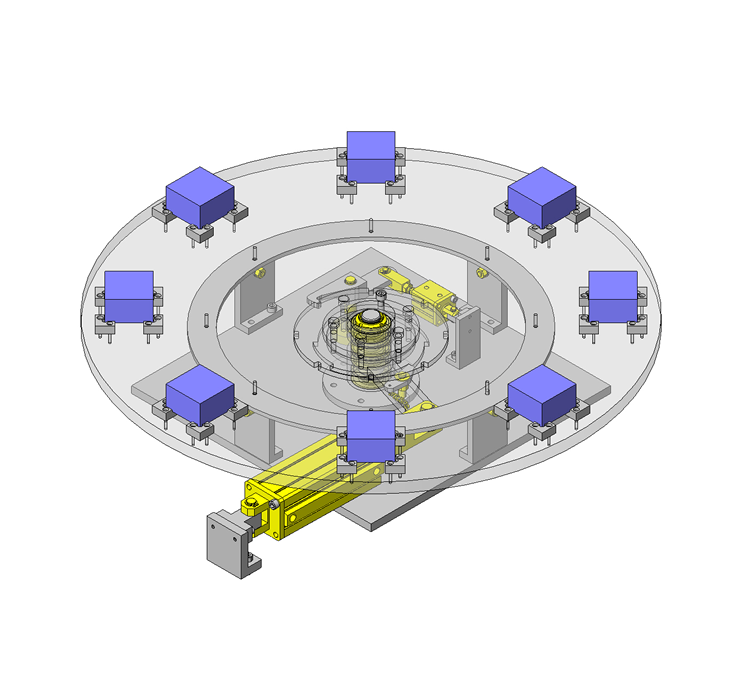
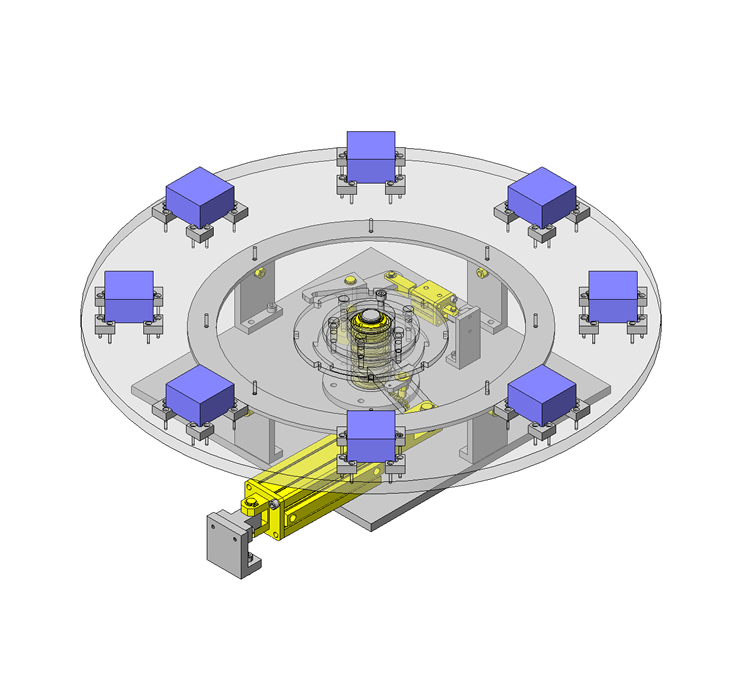
To rotate 8-position index table to process workpiece.
Operation
Performs angle feed of turn table.
By retracting the cylinder, removes the indexing finger from the groove of indexing gear.
As the cylinder is extruded, the ratchet claw is engaged with the ratchet gear, causing the index table to rotate. The tension spring keeps pressing the ratchet claw against the ratchet gear.
The cylinder inserts the indexing claw in the groove of the indexing gear to perform rotational positioning. Retracts cylinder.
Target workpiece
Shape: connector
Size: W50 x D50 x H30mm
Weight: 0.15kg
Design Specifications
Operating Conditions or Design Requirements
Movement angle: 45 degrees
Division by 360/8 degrees
Cylinder stroke: 100mm
Stopper stroke: 10mm
Outer dimensions: Ø600 x H114mm
Selection Criteria for Main Components
Selected an air cylinder that has the thrust specification required to rotate the index table 45 degrees in 1 second.
Design Evaluation
Verification of main components
The cylinder thrust is verified to see whether it can withstand the workpiece load.
Here, calculation for selecting air cylinder thrust is explained.
Conditional value: angle θ = 45degrees, movement time t = 1sec., link arm length L = 0.125m, moment of inertia applied to air cylinder I = 0.5492kg・m²
As uniform acceleration motion is assumed as angular velocity here, θ: oscillating angle (rad), 45° = 2π / 8rad
Angular velocity after t seconds: ω = 2・θ / t = 2 x (2π / 8) / 1 = 1.571rad/sec
Equation of rotary motion: from I・ω = M and M = F・L, cylinder thrust F = I・ω / L = 0.5492 x 1.571 / 0.125 = 6.9N
Theoretical thrust of Ø40 air cylinder: 628 (N) when air pressure in use is 0.5MPa -> As F = 6.9 (N) ≤ 628 (N), this is acceptable.
Other Design Consideration
The ratchet mechanism shall have a sufficient strength. The bending stress shall be 29 (N/mm²) or less and the shearing stress shall be 24.7 (N/mm²) or less.
For the strength of the indexing positioning part, the required torque shall be considered.